Python 高级
1 asyncio
- 异步 IO:就是发起一个 IO 操作(如:网络请求,文件读写等),这些操作一般是比较耗时的,不用等待它结束,可以继续做其他事情,结束时会发来通知。
- 协程(coroutine)也叫微线程,在一个线程中执行,执行函数时可以随时中断,由程序(用户)自身控制,执行效率极高,与多线程比较,没有切换线程的开销和多线程锁机制。
asyncio是从Python3.4引入的标准库,直接内置了对协程异步 IO 的支持。asyncio 的编程模型本质是一个消息循环
- 一般先定义一个协程函数(或任务), 从
asyncio模块中获取事件循环 loop,然后把需要执行的协程任务(或任务列表)扔到 loop 中执行,就实现了异步 IO。
1.1 定义协程函数及执行方法的演变
- 协程(coroutine)函数调用返回值为协程对象(coroutine object)
- 执行:切换到
asynchronize模式
python 3.4: 通过@asyncio.coroutine和yeild from实现```python
import asyncio@asyncio.coroutine
def func1(i):
print(“协程函数{}马上开始执行。”.format(i))
yield from asyncio.sleep(2)
print(“协程函数{}执行完毕!”.format(i))if name == ‘main‘:
# 获取事件循环
loop = asyncio.get_event_loop()

# 执行协程任务
loop.run_until_complete(func1(1))

# 关闭事件循环
loop.close()

# 验证协程函数
print(asyncio.iscoroutinefunction(func1(1))) # True
1
2
3
4
5
6
7
8
9
10
11
12
13
14
15
16
17
18
19
20
21
22
23
- `python 3.5`: 引入了`async/await` 语法定义协程函数
- 每个协程函数都以`async`声明,以区别于普通函数,对于耗时的代码或函数我们使用`await`声明,表示碰到等待时挂起,以切换到其它任务
- ```python
import asyncio
# 这是一个协程函数
async def func1(i):
print("协程函数{}马上开始执行。".format(i))
await asyncio.sleep(2)
print("协程函数{}执行完毕!".format(i))
if __name__ == '__main__':
# 获取事件循环
loop = asyncio.get_event_loop()
# 执行协程任务
loop.run_until_complete(func1(1))
# 关闭事件循环
loop.close()
python 3.7: 更简便的asyncio.run方法```python
import asyncioasync def func1(i):
print(f”协程函数{i}马上开始执行。”)
await asyncio.sleep(2)
print(f”协程函数{i}执行完毕!”)if name == ‘main‘:
asyncio.run(func1(1))1
2
3
4
5
6
7
## 1.2 协程到任务的转变
### 1.2.1 await coroutinue
```python
await run_delay(1, "hello") # await coroutinue
将协程(coroutinue)包装成一个任务(task)
- 告知事件循环(event loop)需要等待该任务执行结束
- yield 暂停该任务
event loop 无法主动获取控制权,必须等待 task 执行完毕或者 task yield
1.2.2 await task
1 | task = asyncio.create_task(run_delay(1, "hello")) |
- 告知事件循环(event loop)需要等待该任务执行结束
- 递交控制权
1.2.3 gather
1 | ret1 = await asyncio.gather(task1, task2, ..., gather_future) |
- 给定 coroutine→ 首先包装成 task
- 给定 task→ 按序进行
- 给定 gather→ 按序进行
1.3 获取返回值
1 | async def run_delay(): |
返回值为
done, pending
- done: 已完成的 coroutinue
- pending: 超时未完成的 coroutinue
1.4 高级使用方法
1.4.1 给任务添加回调函数
1 | def callback(future): |
1.4.2 设置任务超时
1 | # 创建task时设置 |
2 字节码与虚拟机
读取字节码
- ```python
import dis # 字节码: 用来查看函数的字节码
with open(‘file.py’, ‘rb’) as f:
s= f.read()
dis.dis(s)1
2
3
4
5
6
7
8
9
10
11
12
13
14
15
16
17
18
- ```python
import dis
def add(a, b):
return a + b
dis.dis(add)
"""
4 0 RESUME 0
5 2 LOAD_FAST 0 (a)
4 LOAD_FAST 1 (b)
6 BINARY_OP 0 (+)
10 RETURN_VALUE
"""
- ```python
-
3 Code Object
函数调用会在新帧(frame),具体是一个栈
```python
import inspect # inspect: 检查模块
from objprint import op # objprint: 对象打印
2
3
4
5
6
7
8
9
10
11
12
13
14
15
16
17
18
19
20
21
22
23
def f():
frame = inspect.currentframe()
op(frame, honor_existing=False, depth=2)
f()
"""
(
<frame object at 0x000001F6B0B4B1C0
.f_back = <frame xxxx ...>, # 上一帧
.f_builtins = {...}, # 内置变量
.f_code = <code xxx, >, # 代码对象
.f_globals = {...}, # 全局变量
.f_lasti = 0, # 最后执行的指令(返回时执行的雨具)
.f_lineno = 9, # 行号
.f_locals = {...}, # 局部变量
.f_trace = None # 跟踪函数(debugger 相关)
.f_trace_lines = True, # 跟踪行(debugger 相关)
.f_trace_opcodes = False # 跟踪指令(debugger 相关)
)
"""
2
3
4
5
6
7
8
9
10
11
12
13
14
15
16
- 此时可以输出调用函数的相关信息
- ```python
def f():
frame = inspect.currentframe()
print(frame.f_back.f_code.co_filename) # 输出函数执行文件名
print(frame.f_back.f_locals) # 输出调用函数的变量名
print(frame.f_back.f_lineno) # 输出调用行数
def g():
a = 3
b = 4
f()
g()-
1 | def f(): |
1 | import dis |
4 描述器
描述器(descriptor):描述器功能强大,应用广泛,它可以控制我们访问属性、方法的行为,是@property、super、静态方法、类方法、甚至属性、实例背后的实现机制,是一种比较底层的设计
- 定义:从描述器的创建来说,一个类中定义了
__get__、__set__、__delete__中任意一个方法的类,这个类的实例就可以叫做一个描述器。
4.1 调用机制
访问与修改
访问的话自动触发描述器的
__get__方法修改设置的话就自动触发描述器的
__set__方法
装饰器分类
同时定义了
__get__和__set__方法的描述器称为资料描述器只定义了
__get__的描述器称为非资料描述器- 区别:当属性名和描述器名相同时,在访问这个同名属性时,如果是资料描述器就会先访问描述器,如果是非资料描述器就会先访问属性
调用原理
- 当调用一个属性,而属性指向一个描述器时,由
object.__getattribute__()方法控制,会调用描述器
- 当调用一个属性,而属性指向一个描述器时,由
参数解释
- ```python
descr.get(self, obj, type=None) —> value
descr.set(self, obj, value) —> None
descr.delete(self, obj) —> None1
2
3
4
5
6
7
8
9
10
11
12
13
14
15
16
17
18
19
20
21
22
23
24
25
26
27
28
29
30
31
32
33
34
35
36
37
38
39
40
41
42
43
- self 是描述器类 M 中的实例
- obj 是调用描述器的类 a 中的实例
- type 是调用描述器的类 A
- value 是对这个属性赋值时传入的值
## 4.2 不同方法的描述器原理
- 静态方法相当于不自动传入实例对象作为方法的第一个参数,类方法相当于将默认传入的第一个参数由实例改为类
- 使用`@classmethod`后无论类调用还是实例调用,都会自动转入类作为第一个参数,不用手动传入就可以调用类属性,而没有`@classmethod`的需要手动传入类
- 既不用`@classmethod`也不用`@staticmethod`则类调用时不会自动传入参数,实例调用时自动传入实例作为第一个参数
- 所以说加`@classmethod`是为了更方便调用类属性,加`@staticmethod`是为了防止自动传入的实例的干扰
- 除此之外要说明一点:当属性和方法重名时,调用会自动访问属性,是因为这些方法调用的描述器都是非资料描述器。而当我们使用`@property`装饰器后,自动调用的就是新定义的`get set`方法,是因为`@property`装饰器是资料描述器
## 4.3 @property
```python
# 装饰器形式,即引言中的形式
class A:
def __init__(self, name, score):
self.name = name # 普通属性
self.score = score
@property
def score(self):
print('getting score here')
return self._score
@score.setter
def score(self, value):
print('setting score here')
if isinstance(value, int):
self._score = value
else:
print('please input an int')
a = A('Bob',90)
# a.name # 'Bob'
# a.score # 90
# a.score = 'bob' # please input an int
- ```python
4.4 访问 a.b 的逻辑
程序会先查找
a.__dict__['b']是否存在- 资料描述器 → 属性(__dict___)→ 非资料描述器
不存在再到
type(a).__dict__['b']中查找然后找
type(a)的父类期间找到的是普通值就输出,如果找到的是一个描述器,则调用
__get__方法示例
```python
class Name:def __get__(self, obj, objtype): print("__get__") return "Bay"class A:
name = Name()
obj = A()
obj.name = 'Xxx'
print(obj.__dict__) # {'name': 'Bob'}
print(obj.name) # Xxx
Name.__set__ = lambda x, y, z: None
print(obj3.name) # Bay
1
2
3
4
5
6
7
8
9
10
11
12
13
14
15
16
17
18
19
20
21
22
23
24
25
26
27
28
29
30
31
32
33
34
35
36
## 4.5 简单应用: 限制变量类型
```python
class Checkint:
def __init__(self, name):
self.name = name
def __get__(self, instance, owner):
if instance is None:
return self
else:
return instance.__dict__[self.name]
def __set__(self, instance, value):
if isinstance(value, int):
instance.__dict__[self.name] = value
else:
print('please input an integer')
# 类似函数的形式
class A:
score = Checkint('score')
age = Checkint('age')
def __init__(self, name, score, age):
self.name = name # 普通属性
self.score = score
self.age = age
a = A('Bob', 90, 30)
a.name # 'Bob'
a.score # 90
# a.score = 'bob' # please input an int
# a.age='a' # please input an integer
5 装饰器
5.1 闭包 Closure
闭包(Closure):在一个内部函数中,对外部作用域的变量进行引用,(并且一般外部函数的返回值为内部函数),那么内部函数就被认为是闭包
1 | def outer(x): |
闭包无法修改外部函数的局部变量
```python
def outer2():x = 0 def inner(): x += 1 return x print("outer x before call inner: ", x) inner() print("outer x after call inner: ", x)
outer2() # UnboundLocalError: cannot access local variable 'x' where it is not associated with a value
1
2
3
4
5
6
7
8
9
10
11
12
13
14
15
16
17
18
19
20
21
22
23
24
25
26
27
28
29
- 循环中不包含域的概念
- ```python
flist = []
for i in range(3):
def func(x):
return x * i
flist.append(func)
for f in flist:
print(f(2)) # 4 4 4
# 修改方案
flist = []
for i in range(3):
def makefun(i):
def func(x):
return x * i
return func
flist.append(makefun(i))
for f in flist:
print(f(2)) # 0 2 4
5.2 装饰器 Decorator
函数运行:执行一个变量的
callable
- 装饰器: 强函数或类的功能的一个函数,实际是闭包的一种应用
- 增强函数的功能,确切的说,可以装饰函数,也可以装饰类
- 原理:函数也是对象,实际执行的是
__call__magic function
1 | import time |
5.3 带参装饰器
不带参: 两层函数调用
decorator(func)(args)带参: 三层函数调用
crete_decorator(args1)(func)(args2)```python
带参数的装饰器
def time_log_with_print(text): # 返回一个装饰器
print("text: ", text) # 这部分在标注时会立即执行,无需等到调用(实际上是执行外层函数后, 生成一个装饰器, 再进行标注) def inner(f): def log(*args, **kwargs): start = time.time() res = f(*args, **kwargs) print("time: ", time.time() - start) return res return log return inner@time_log_with_print(“hello world”) # 等效于执行 time_log_with_print(“hello world”)(my_sleep)
def my_sleep(x):time.sleep(x)my_sleep(2) # 等效于执行 time_log_with_print(“hello world”)(my_sleep)(2)
1
2
3
4
5
6
7
8
9
10
11
12
13
14
15
16
17
18
19
20
21
22
23
24
25
## 5.4 内置装饰器
- `@property`: 类内方法当成属性使用,必须要有返回值,相当于 getter
- ```python
class Car:
def __init__(self, name, price):
self._name = name
self._price = price
@property
def car_name(self):
return self._name
# car_name可以读写的属性
@car_name.setter
def car_name(self, value):
self._name = value
@property # car_price是只读属性
def car_price(self):
return str(self._price) + '万'@staticmethod:不需要表示自身对象的 self 和自身类 cls 参数的方法- 假如不需要用到与类相关的属性或方法时,就用静态方法@staticmethod
@classmethod:不需要 self 参数,但是第一个参数需要表示 cls 参数- 假如需要用到与类相关的属性或方法,然后又想表明这个方法是整个类通用的,而不是对象特异的,就可以使用类方法@classmethod
5.5 类装饰器
用法与函数装饰器并没有太大区别,实质是使用了类方法中的 call 魔法方法来实现类的直接调用
1 | # 类装饰器 |
带参数的类装饰器
```python
1
2
3
4
5
6
7
8
9
10
11
12
13
14
15
16
17
18
19
20
21
22
## 5.6 类的装饰器
```python
def add_str(cls):
def __str__(self):
return str(self.__dict__)
cls.__str__ = __str__
return cls
@add_str
class MyObject:
def __init__(self, a, b) -> None:
self.a = a
self.b = b
# 等价于
MyObject = add_str(MyObject)
obj = MyObject(1, 2)
print(obj) # {'a': 1, 'b': 2}
5.7 装饰器的类封装
问题:如何将装饰器定义在类内,并且装饰该类的对象?
:key: 直接定义函数,无需加 self, cls 等参数
- 实际上类就是将 code block 作为一个单独的域进行执行
1 | # 示例 |
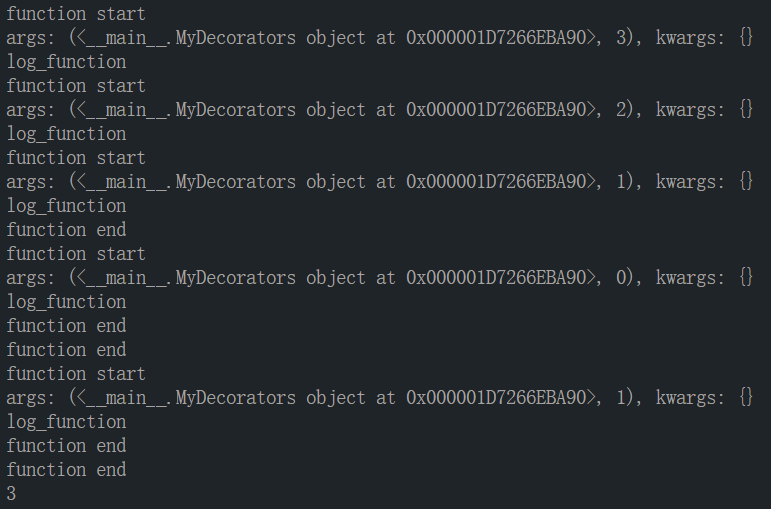
- 测试结果:

6 迭代器与生成器
6.1 迭代器
6.1.1 相关概念
容器 container:容器就是存储某些元素的统称,它最大的特性就是判断一个元素是否在这个容器内
- 通常使用
in或not in来判断一个元素存在/不存在于一个容器内 - 本质:实现
__contains__方法
- 通常使用
迭代器 iterator:一个可以记住遍历的位置的对象
本质:实现以下两个方法的对象
__iter__:这个方法返回迭代器对象本身,即self- ```python
通常如此
def iter(self):
return self1
2
3
4
5
6
7
8
9
10
11
12
13
14
15
16
17
18
19
20
21
22
23
24
25
26
27
28
29
30
31
32
- `__next__`:这个方法每次返回迭代的值,在没有可迭代元素时,抛出 `StopIteration` 异常
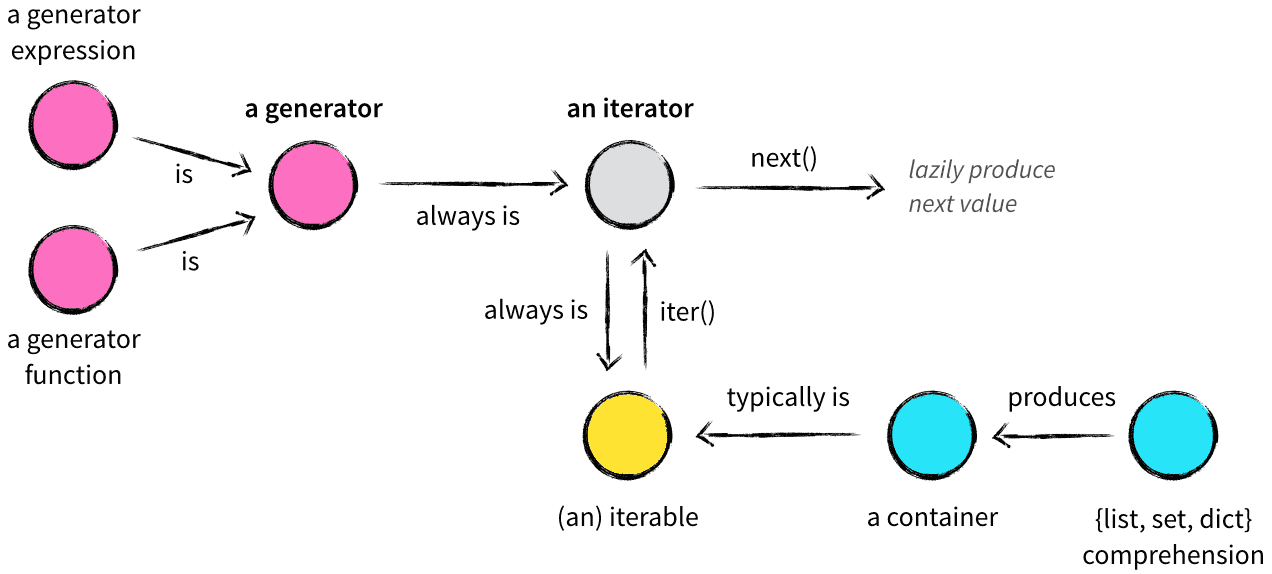
- 可迭代对象 iterable:可以返回一个迭代器的对象都可以称之为可迭代对象
- 可迭代对象实现了 `__iter__()` 方法,该方法返回一个迭代器对象
- 
- `for...in...`的迭代实际是将可迭代对象转换成迭代器,再重复调用`next()`方法实现的
## 6.2 生成器
- 生成器 Generator:用`yield`返回值的函数
- 函数被调用时会返回一个生成器对象
- 生成器一定是迭代器(反之不成立),因此任何生成器也是一种懒加载的模式生成值
- 调用 **生成器函数** 返回一个 **生成器对象**
- 生成器函数: 产生生成器的函数(用`yield`返回值的函数)
- 生成器对象:生成器函数返回的对象
- **yield**: 会记录返回的内容,下次调用会返回下一个
- 实现`__next__()`方法的关键
- ```python
def gen(num):
while num > 0:
yield num
num -= 1
return # 实际上调用 raise StopIteration, 不会真的返回
- ```python
send():改变此时迭代器的位置
```python
def gen(num):while num > 0: tmp = yield num if tmp is not None: num = tmp num -= 1g = gen(5)
first = next(g) # first = g.send(None)
print(f”first: {first}”) # first: 5
print(f”send: {g.send(10)}”) # send: 9for i in g:
print(i) # 8 7 6 5 4 3 2 11
2
3
4
5
6
7
8
9
10
11
12
13
14
15
16
17
18
19
20
21
```python
class Node:
def __init__(self, name) -> None:
self.name = name
self.next = None
def __iter__(self):
node = self
while node:
yield node
node = node.next
node1 = Node("node1")
node2 = Node("node2")
node3 = Node("node3")
node1.next = node2
node2.next = node3
for node in node1:
print(node.name) # node1 node2 node3
6.3 区别
- 迭代器:将此刻的值存储在类的变量内
- 生成器:将此刻的值存储在帧栈(frame)的一个空间内
7 真的判定
1 | # True/False |
8 MRO
8.1 概念
- MRO(Method Resolution Order,方法解析顺序)
- 从左往右,采用深度优先搜索(DFS)的算法,称为旧式类的 MRO;
- 自 Python 2.2 版本开始,新式类在采用深度优先搜索算法的基础上,对其做了优化;
- 自 Python 2.3 版本,对新式类采用了 C3 算法。由于 Python 3.x 仅支持新式类,所以该版本只使用 C3 算法。
8.2 C3 算法
- a consistent extended precedence graph(继承优先图一致性):继承图内会列出所有祖先,同时不会包含其他类
- preservation of local precedence order(保持局部优先顺序):多继承时优先使用写在前面的方法
- fitting a monotonicity criterion(拟合单调性准则):父类的 MRO 顺序子类也需要遵守,即子类不改变父类的方法搜索顺序
- 符号定义
- $C_1C_2…C_N$
- 表示类列表 $[C_1, C_2, …, C_N]$
- 列表的首元素 $Head = C_1$
- 其余元素为尾 $Tail = C_2…C_N$
- $C+(C_1C_2…C_N)=CC_1C_2…C_N$
- 表示 $[C]+[C_1, C_2, …, C_N]$ 列表的和
- 考虑多继承层次结构中的类 C,其中 C 继承自基类 B1、B2、…、BN。我们要计算 C 类的线性化 L[C]。规则如下:
- C 的线性化是 C 加上父元素的线性化和父元素列表的合并的和
- $L[C(B_1…B_N)]=C+merge(L[B_1]…L[B_N],B_1…B_N)$
- 特别的,无父类的对象类
- $L[object]=object$
- $merge()$
- 检查第一个列表的头元素(如 L[B] 的头),记作 H。
- 若 H 未出现在 merge 中其它列表的尾部,则将其输出,并将其从所有列表中删除,然后回到步骤 1;否则,取出下一个列表的头部记作 H,继续该步骤;
- 重复上述步骤,直至列表为空或者不能再找出可以输出的元素。如果是前一种情况,则算法结束;如果是后一种情况,Python 会抛出异常。
- $C_1C_2…C_N$
8.3 读取 MRO
1 | print(A.__mro__) |
9 GIL-全局解释器锁
GIL(Global Interpreter Lock, 全局解释器锁):In CPython, the global interpreter lock, or GIL, is a mutex that prevents multiple native threads from executing Python bytecodes at once. This lock is necessary mainly because CPython’s memory management is not thread-safe. (However, since the GIL exists, other features have grown to depend on the guarantees that it enforces.)
在 CPython 中,全局解释器锁或 GIL 是一个互斥体,阻止多个本地线程同时执行 Python 字节码。这种锁是必要的,主要是因为 CPython 的内存管理不是线程安全的。(然而,由于 GIL 的存在,其他特征已经变得依赖于它所执行的保证。)
:key: 其为 CPython 的概念;是为解释器加的锁
- 作用:防止多个本地线程同时执行 Python 字节码(也导致了 Python 无法实现真正的多线程执行)
引用计数:Python 使用“引用计数”进行内存管理,即:在 Python 中创建的对象都有对应的“引用计数”变量 跟踪记录着该对象的引用次数。当“引用计数”减为 0,该对象占据的内存就会被释放。
- 内存泄漏
- 错误释放了实际还在被引用的对象
相关处理方法
使用多进程代替多线程 (multiprocessing)
多进程的创建和切换会消耗额外资源
```python
from multiprocessing import Pool
from time import sleep
import time
def run(x):
sleep(5)
return x * x
if __name__ == "__main__":
print(
f"start time: {time.strftime('%Y-%m-%d %H:%M:%S', time.localtime(time.time()))}"
)
with Pool(5) as p:
print(p.map(run, [1, 2, 3, 4, 5]))
print(
f"end time: {time.strftime('%Y-%m-%d %H:%M:%S', time.localtime(time.time()))}"
)
1
2
3
4
5
6
7
8
9
10
11
12
13
14
15
16
17
18
19
20
21
22
23
24
25
26
27
28
29
30
31
32
33
34
35
36
37
- 使用其余的可选解释器
- CPython/Jython/IronPython/PyPy
- 分别对应:C/Java/C#/Python
- 等待语言本身的优化 :sweat_smile:
# 10 metaclass
> - 支持用户自定义一个类,其为某一个类的元类
> - `A = type(M, (), {})` 动态建类方法
> - 作用
> - 控制实例的创建
```python
class M(type):
def __new__(cls, name, bases, attrs):
print(name, bases, attrs)
return type.__new__(cls, name, bases, attrs)
def __init__(self, name, bases, attrs):
print(name, bases, attrs)
return type.__init__(self, name, bases, attrs)
def __call__(cls, *args: Any, **kwds: Any) -> Any:
print(f"call 方法在生成实例时调用")
return type.__call__(cls, *args, **kwds)
class A(metaclass=M):
pass
print(f"定义实例")
o = A() # call 方法在生成实例时调用
:key: 使用 super 定义
2
3
4
5
6
7
8
9
10
11
12
def __new__(cls, name, bases, attrs):
print(name, bases, attrs)
return super().__new__(cls, name, bases, attrs)
def __init__(self, name, bases, attrs):
print(name, bases, attrs)
return super().__init__(name, bases, attrs)
def __call__(cls, *args: Any, **kwds: Any) -> Any:
print(f"call 方法在生成实例时调用")
return super().__call__(*args, **kwds)
11 __slots__
slots是一个元组,包括了当前能访问到的属性;是 python class 的一个特殊 attribute
- 作用:
- 节省 memory
- access attributes 更快
- 注意事项
- 当 inherit from a slotted class,那么子类自动变成 slotted 并且获得 parent class 的 slots;子类可以定义新的 elements 加入到 inherited slots 里
- 在 multiple inheritance(比如 mixedins)里,如果两个 parents 定义了不同的 nonempty slots,那么 python 会报错。这个时候,就进一步 factor out 母类的 slots
- 需要使用比较新的 pickle 版本来 pickle 含有 slotted class
1 | class A: |
12 super
- super 是一个类
super(type, type_or_object)
- 决定 MRO 寻找位置, 对应的是参数中的父类
- 决定使用该初始化的对象, 以及对应的 MRO(查找顺序)
1 | print(type(super)) # <class 'super'> |
13 @staticmethod/@classmethod
1 | class A: |
14 私有变量
1 | class A: |
- wechat
- alipay